Embryo 4D Micro (Zeiss Axioplan 2 Axiovision 4.5)
Contributed by Ian Chin-Sang, Queens University, ON, Canada
Embryo 4D Microscopy Using the Zeiss Axioplan 2 and Axiovision 4.5 Software
- Start Axiovision Rev 4.5 (make sure the camera and microscope are turned on). You want to setup the Axiovison parameters before putting the embryo on the slide
- Microscope settings: Objective 10X or 20X (before oil). Transmitted light filters should be set at 4 and 2 for low neutral setting (not much light comes through). If you choose low neutral for 4D in channels settings for during acquisition these filter setting will be set for you automatically.
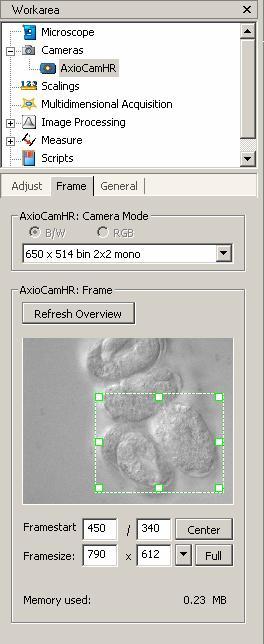
- Camera Settings: You want to frame your image as 1 embryo will not take up all the camera capture area. This will also reduce the size of your movie file. See boxed area below. You also want to choose 650 X 514 bin 2X2 mono in the camera mode. If you use standard mode 1300X1030 your file will be greater than 2GB after 8 hours of time lapsed capture.
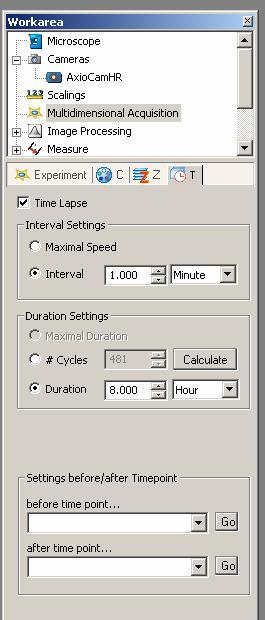
- Multidimensional Acquisition: You can load a saved experiment or setup a new one with the following properties. Experiment: make sure that the Z stack and Time lapse boxes are checked.
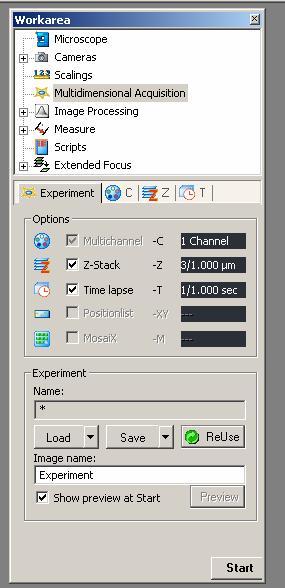
- You can give the experiment a name (and save the parameters for future use) and you can also give the Image a name.*
- Channel Assignments (C):
During Acquisition choose DIC (low neutral setting for 4D) You can take a measurement but it will change at 40X or 63X oil. You want to make sure that the exposure time is less than 100ms at 63X objective lens. If the embryo looks too dark do not worry about this as we can increase brightness and contrast after we captured the recordings. You don’t want too much light and too much exposure as the embryo could heat up and die.
After Acquisition setting choose: nothing- i.e. leave this blank (This is very important!) we used to have the shutter closed here but this results in the shutter being close between each Z-section. Instead close the transmitted light shutter after the Z-stack. See below. 10Xà 40X oil -> 63X oil

Make sure you have the DIC prism matched with the objective lens i.e DIC prism III with 40X and 63X and DIC II with 20X
- Z stack: While your are in 40X or 63X oil objectives focus in the middle of the embryo.
The Z stack box should be checked and you want the Start/Stop mode (not the Center Mode). You want to choose a Z stack of about 20mm (10 slices at 2 mm each). To do this first focus to the bottom of the embryo by turning the focusing knob on the right counter clockwise (i.e. your right thumb moves downward). Focus until you just reach out of focus. Press the “Start” button . Now move up in the focus (right thumb move up) so you get about 10 slices. If you need to move up more to get out of focus then put in more slices. If you want to add more slices add to the top of the embryo (i.e focus with right thumb moving up and then press “stop” The start and stop buttons sets the interval.
If you are making short movies (less than 2 hours) then you may take sections at 1mm and take more sections to get greater details. Important! Make sure to choose after Z-stack… “transmitted shutter close” This way the light will be off the embryo between time points.
- Time points (T): Choose interval as 1 minute and the duration should be about 8 hours.
- Once all parameters are set you can hit “start” at the bottom right hand of the work area. Also when you start the capture, make sure to pull the right knob out all the way and the left one pushed in to allow all the light to go to the camera port (See green arrows below).

- After the recording is done save your file. Make sure to return the objective lens to 10X with the stage up and clean off any oil from the objectives. Close Axiovision and turn off the microscope and the camera Don’t forget to cover the microscope.
This method is based, with permission, on an original protocol available here.